Step-by-step installation process for aftermarket fog lights on Yamaha Tracer 900
When performing a Yamaha Tracer 900 fog light installation, preparation is crucial. Begin by securing the motorcycle on a stable stand to ensure safety throughout the process. Access the motorcycle’s front area by removing any panels obstructing the frame where the fog light brackets will be mounted. On the Tracer 900, these access points are usually near the lower fork tubes or under the fairing. Carefully identify the mounting locations before proceeding.
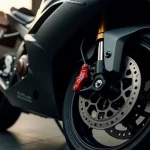
Next, attach the mounting bracket and hardware. Use the provided bolts and mounts specifically designed for the Tracer 900 to guarantee a secure fit. Align the brackets so the fog lights aim slightly downward to improve visibility without impairing the rider’s view.
Topic to read : Unlock the full potential of your kawasaki zx-10r’s abs: 10 essential tips for peak performance
For the electrical aspect, wiring the fog lights directly to the motorcycle’s system is the next step. Connect the fog lights’ positive and negative wires to the Tracer 900’s battery terminals or fuse box, following the manufacturer’s wiring diagram. Installing a dedicated switch on the handlebar is recommended for easy control. Secure and insulate all connections to prevent moisture intrusion. This method ensures your motorcycle lighting upgrade is both reliable and durable.
Essential tools and materials for installing fog lights on the Yamaha Tracer 900
Understanding your setup
Have you seen this : Ultimate guide: how to replace the air temperature sensor on your triumph street triple – a step-by-step walkthrough
For a seamless fog light installation on the Tracer 900, assembling the right tools is crucial. Start with a quality set of screwdrivers and socket wrenches, as these will allow you to remove and secure the motorcycle’s panels and fog lights without damage. A wire stripper and crimper are essential for preparing and securing electrical connections. Testing voltage with a multimeter ensures your wiring meets safety standards before final assembly, reducing risks of shorts or failures.
Materials play a significant role in durability. Use weatherproof connectors and heat-shrink tubing to protect electrical joints from moisture, a common challenge on motorcycles. Nylon zip ties help with tidy cable management, preventing tangles or wear during rides. When choosing fog lights, opt for Yamaha motorcycle electrical accessories compatible with the Tracer 900 to maintain factory-quality performance.
Reliable aftermarket wiring kits tailored to the Tracer 900 not only simplify installation but also provide the necessary relay and fuse for safe operation. Locating these components from reputable suppliers guarantees long-term reliability and enhances safety during low-visibility conditions.
Wiring diagrams and safe electrical connections for fog light installation
Ensuring secure and effective wiring for your Tracer 900
When installing fog lights on your Tracer 900, following a precise wiring diagram is crucial. The Tracer 900 wiring diagram for fog light wiring typically includes connecting the fog lights to a switched power source, a reliable ground, and a dedicated fuse for safety. This setup minimizes the risk of overloading your motorcycle’s electrical system.
Best practices for splicing and routing wires focus on using quality connectors and heat shrink tubing to protect connections from moisture and vibration. Routing wires away from moving parts and heat sources prevents premature wear or shorts, enhancing overall durability. Always secure wires with zip ties or loom to avoid unnecessary strain.
Common pitfalls include improper grounding, inadequate fusing, and incorrect splicing, which can cause electrical failures or even hazards. Ensure all connections are tight, and avoid tapping into high-current circuits without proper relays. Prioritizing a safe motorcycle electrical connection not only protects your bike but also guarantees reliable fog light performance in adverse conditions.
Expert techniques for precise alignment and optimal light performance
Achieving expert fog light alignment on your Yamaha Tracer 900 is crucial for enhancing road visibility without causing glare. Start by positioning the motorcycle on a level surface about 25 feet from a flat wall. Turn on the fog lights and mark the beam’s center—that should align slightly below the rider’s eye level and just off the centerline to avoid blinding oncoming traffic.
One effective fog light aiming tip is to ensure the beam pattern is broad horizontally but cut off sharply at the top. This technique maximizes illumination on the road and shoulders while minimizing light scatter that can interfere with other drivers’ vision.
Vibration resistance is essential post-installation. Use anti-vibration mounts and tighten all fixtures securely to maintain alignment even on rough terrain. Regularly check and readjust lights as needed, especially after extended rides.
These expert fog light alignment methods ensure your Yamaha Tracer 900 delivers optimal lighting performance while safeguarding both your safety and that of others on the road. Consistent practice and attention to detail make these adjustments simple yet highly effective.
Troubleshooting and resolving installation issues
Experience with Tracer 900 lighting problems often begins during installation. A common issue is flickering fog lights, which usually indicates an unstable power supply. Ensure that the wiring harness is properly connected and that the battery voltage is sufficient. Loose or corroded connectors can cause intermittent power loss; cleaning and tightening these connections often resolves flickering.
Another frequent problem is water ingress, especially if the fog light housing is not sealed correctly. This can cause short circuits or corrosion, leading to malfunction. Inspect seals and gaskets carefully, and replace them if damaged. Using dielectric grease on connectors can prevent moisture buildup.
If basic troubleshooting does not fix the issue, the problem may lie deeper in the motorcycle’s electrical system. For example, a faulty relay or an incompatible accessory can create complications. In such cases, seeking motorcycle installation support from a Yamaha specialist is advisable. Their expertise can ensure the correct diagnosis of wiring faults or electrical failures that DIY methods might miss.
Effective fog light troubleshooting involves a systematic approach: check power, inspect physical connections, and consider environmental factors like moisture. This helps maintain safe and reliable lighting performance on your Tracer 900.
Recommended aftermarket fog light products and expert insights
When seeking the best fog lights for Tracer 900, prioritizing compatibility and durability is essential. High-quality aftermarket fog lights enhance visibility and safety without compromising your bike’s aesthetics or electrical system.
LED fog lights are widely preferred due to their superior brightness, long lifespan, and energy efficiency compared to halogen alternatives. They deliver a crisp, white beam that better penetrates foggy conditions, improving rider confidence in low-visibility scenarios. For those considering halogen fog lights, while generally less expensive, expect shorter bulb life and reduced illumination quality.
Expert product advice stresses checking the build quality thoroughly. Look for fog lights constructed with impact-resistant materials and weatherproof seals to withstand harsh riding environments. Additionally, evaluate the light’s beam pattern—ideally, it should offer a wide and low spread to minimize glare and effectively illuminate the road beneath fog.
Finally, ensure the chosen lights align with your Tracer 900’s voltage and mounting options. Installing fog lights designed explicitly for this model reduces complications and enhances overall performance, making your rides safer and more enjoyable.
Safety precautions and legal considerations for motorcycle fog lights
Ensuring compliance and safety on every ride
When installing motorcycle fog lights, prioritizing safety and legality is essential. Proper motorcycle lighting safety starts with mounting fog lights securely, ensuring they do not obstruct the rider’s view or distract other drivers. Lights should be positioned low on the front of the bike to maximize road illumination while minimizing glare. To achieve this, many riders use mounting brackets designed specifically for models like the Tracer 900, enhancing stability and compliance.
Regarding legal fog light installation, regulations vary by location but commonly restrict modifications that create excessive brightness, improper colors, or incorrect beam patterns. Some jurisdictions mandate that fog lights only operate when headlights are on, while others limit the number allowed on a single motorcycle. Riders should consult local laws to avoid violating lighting codes that could lead to fines or safety risks.
Avoiding common legal pitfalls with aftermarket lighting involves verifying that any added fog lights meet standards for brightness and color temperature. Non-compliant lights may fail inspections or cause dangerous glare, reducing visibility for all road users. Adhering to these guidelines ensures both safety and Tracer 900 compliance, allowing riders to enhance visibility responsibly.
Precision and Recall in SQuAD Evaluation
Understanding precision and recall is essential for evaluating question-answering models using the Stanford Question Answering Dataset (SQuAD). Precision measures the accuracy of the tokens predicted by the model compared to the true answer tokens. It is calculated as the number of correctly predicted tokens (tp) divided by the total tokens predicted (tp + fp). Recall, in contrast, evaluates coverage by dividing the number of correctly predicted tokens (tp) by all tokens in the ground truth answer (tp + fn).
In this context:
- tp (true positives) are tokens correctly shared between the prediction and the actual answer.
- fp (false positives) are tokens present in the predicted answer but absent in the correct answer.
- fn (false negatives) are tokens in the correct answer but missed by the prediction.
For example, if the true answer is “Stanford University” and the model predicts “Stanford”, then tp would be “Stanford”, fp is zero, and fn would be “University”. This shows the prediction has perfect precision but imperfect recall.
Balancing precision and recall helps build models that provide accurate and complete answers, a crucial step in advancing question-answering technology.